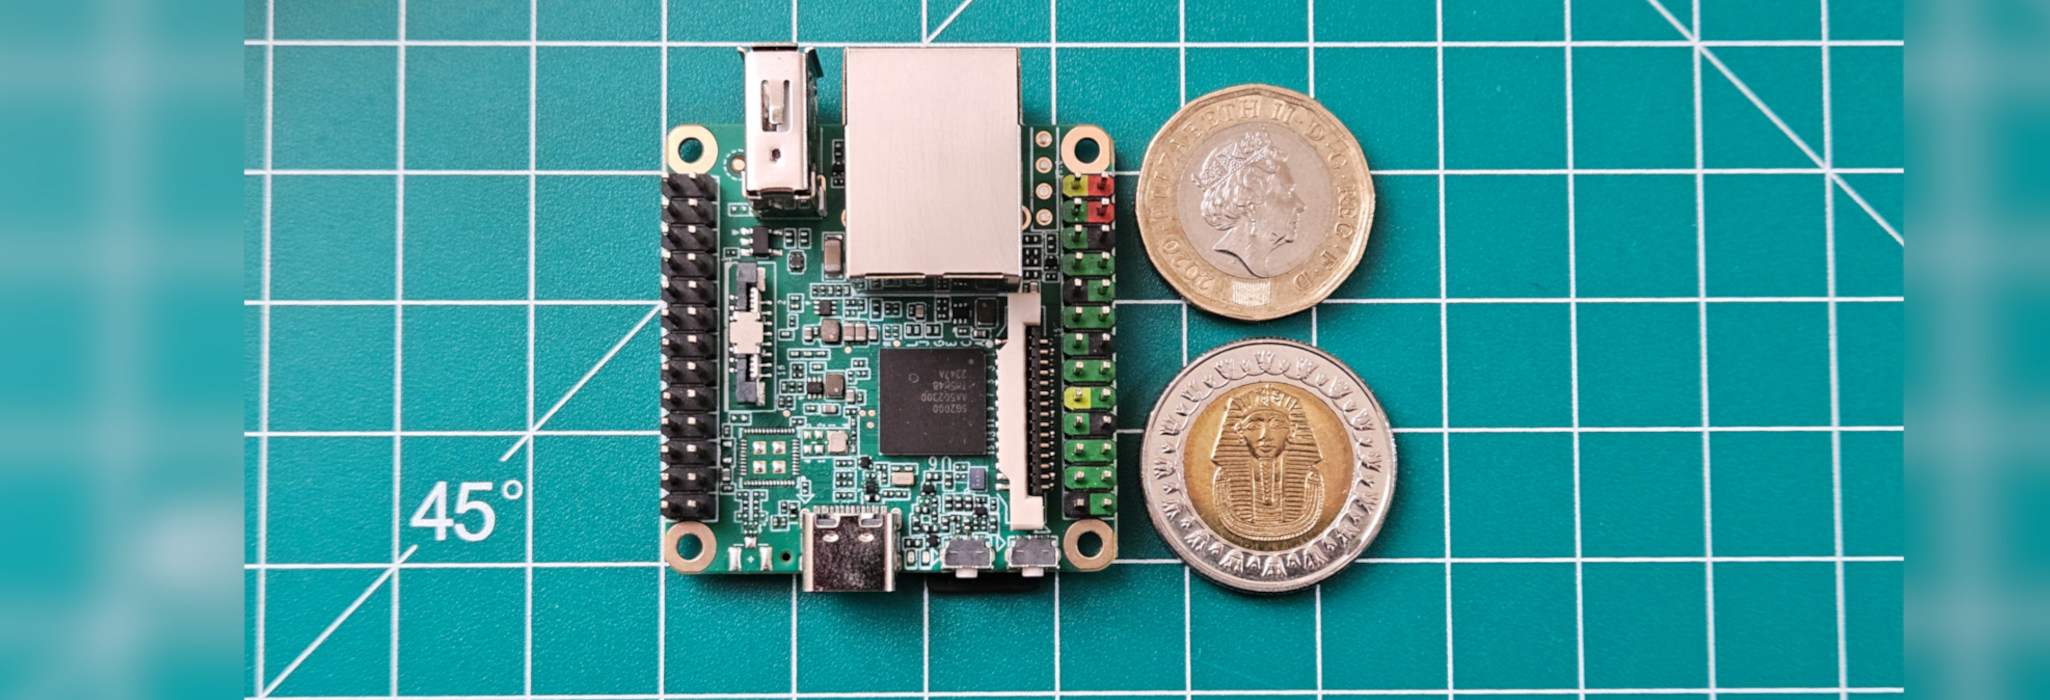
Last week, a friend of mine gave me an interesting single-board computer with the goal of getting it to communicate with another chip he was working with over I2C. The SBC is quite small. It has 2 RISC-V cores, an ARM core, and a whopping 512 megabytes of RAM… It can also run RTOS and Linux simultaneously, and has an open source SDK. For just under £10, I really can’t complain much. I am talking about the Milk-V Duo S.
Now you may be wondering, what does milk have to do with RISC-V? I honestly have no clue. Anyways, we have a cheap SBC, half-baked documentation, and a drea… I mean a goal of running I2C code functionally on it.
Inter-Integrated Circuit (or I2C/I2C/IIC for short) is a synchronous serial communication bus. It consists of two lines, a data line, and a clock line. It is designed to have a single controller (AKA master) and many peripherals (AKA slaves). Each peripheral has its own address and the controller has to address the peripheral first before sending any data. I could go into lots of detail on how I2C works, though I’d rather have you read this tutorial from SparkFun as it is very thorough.
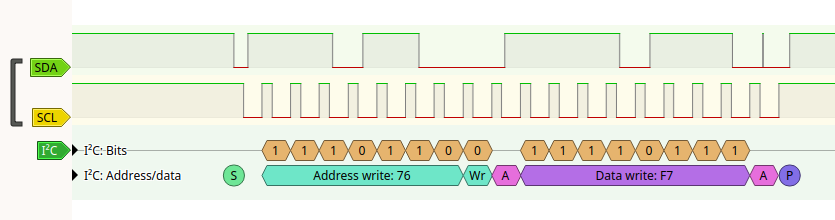
From PulseView using a Sipeed Logic Analyser, an example of I2C communication where the controller sends 0x76 represented as a 7-bit number, followed by a 0 bit (indicating a write) and then proceeds to write the value 0xF7 as a single byte of data to the peripheral
Initial Setup
In this section, I briefly highlight how to get the environment running. If you’re not interested and want to get to the deeper technical parts of this blog post, then skip to The Chip section.
Installing Linux
The first step is to run Linux on the thing. For that, we have two options, listed in the Milk-V Duo series documentation:
- The first option is to build the image from scratch by following the instructions in the duo-buildroot-sdk repo
- This could be useful if you want to modify the image somehow
- The second option is to use one of the prebuilt images released on the same GitHub repo
- Another cool option I found was this article on XYZdims.com. There are quite a few other Linux distributions built for the Milk-V boards. However, I didn’t find any images for the Duo S (the one at hand)
After you have an image file, burn it to a micro SD card and plug it into the Duo S and power it on. After the Duo S boots, you should be prompted with a fun ash prompt. You can then connect to it using either with ssh via Ethernet over USB, or the serial port using UART.

Running Programs on the Duo S
When I first connected to the board over SSH, I expected to find gcc somewhere. I did not. By default, the image only contains libraries and a runtime environment to be able to run executables built for RISC-V64 using musl. Luckily, though, Milk-V boards have an open source SDK that you can use to cross-compile programs.
So, what we will do is cross-compile our programs on our host and copy them via SSH to the Duo S. You can follow the steps on the SDK repo, which should be straightforward. The SDK uses the WiringX library. WiringX abstracts the pins of many platforms with generic functions. This allows the same code to be run on any platform that supports WiringX. In this case, Milk-V are using their own fork called duo-wiringx.
Another option that I managed to get to work as well is downloading the RISC-V64 cross musl-based toolchain from musl.cc. This worked well but didn’t have support for WiringX. In this case, I had to build the library myself. Check the section Using Homebrew WiringX for instructions on how to do that.
The Chip
Let’s get to the mysterious chip that my friend gave me. The chip is a microprocessor that communicates over I2C, where it is programmed to respond to specific commands with data back on the I2C bus. Sounds simple enough. All we have to do is write a program that can read from and write to the I2C peripheral chip at hand. The WiringX library has wiringXI2CReadReg8() and wiringXI2CWriteReg8() that we can use to read and write 8-bit values from and to the chip. Sounds like a plan.
So, do we have everything sorted out now? Sadly, no. The chip we’re communicating with has 32-bit registers that hold values that are sent back on the I2C bus. So, in this case, the ReadReg8() and WriteReg8() functions will not work for those registers. Fret not, dear reader, we can implement our own ReadReg32() and WriteReg32() functions. However, as an even better way to support all other kinds of I2C chips, we will implement ReadBlockData() and WriteBlockData() functions which are implemented by many other I2C libraries. This allows us to read and write any number of bytes to the device at the specified address regardless of the size of the device’s registers.
How does WiringX work?
WiringX makes use of the Linux I2C/SMBus subsystem. What it boils down to is calling input/output control (ioctl()) system calls with the Linux I2C bus as a parameter to specify that it is using the I2C bus.
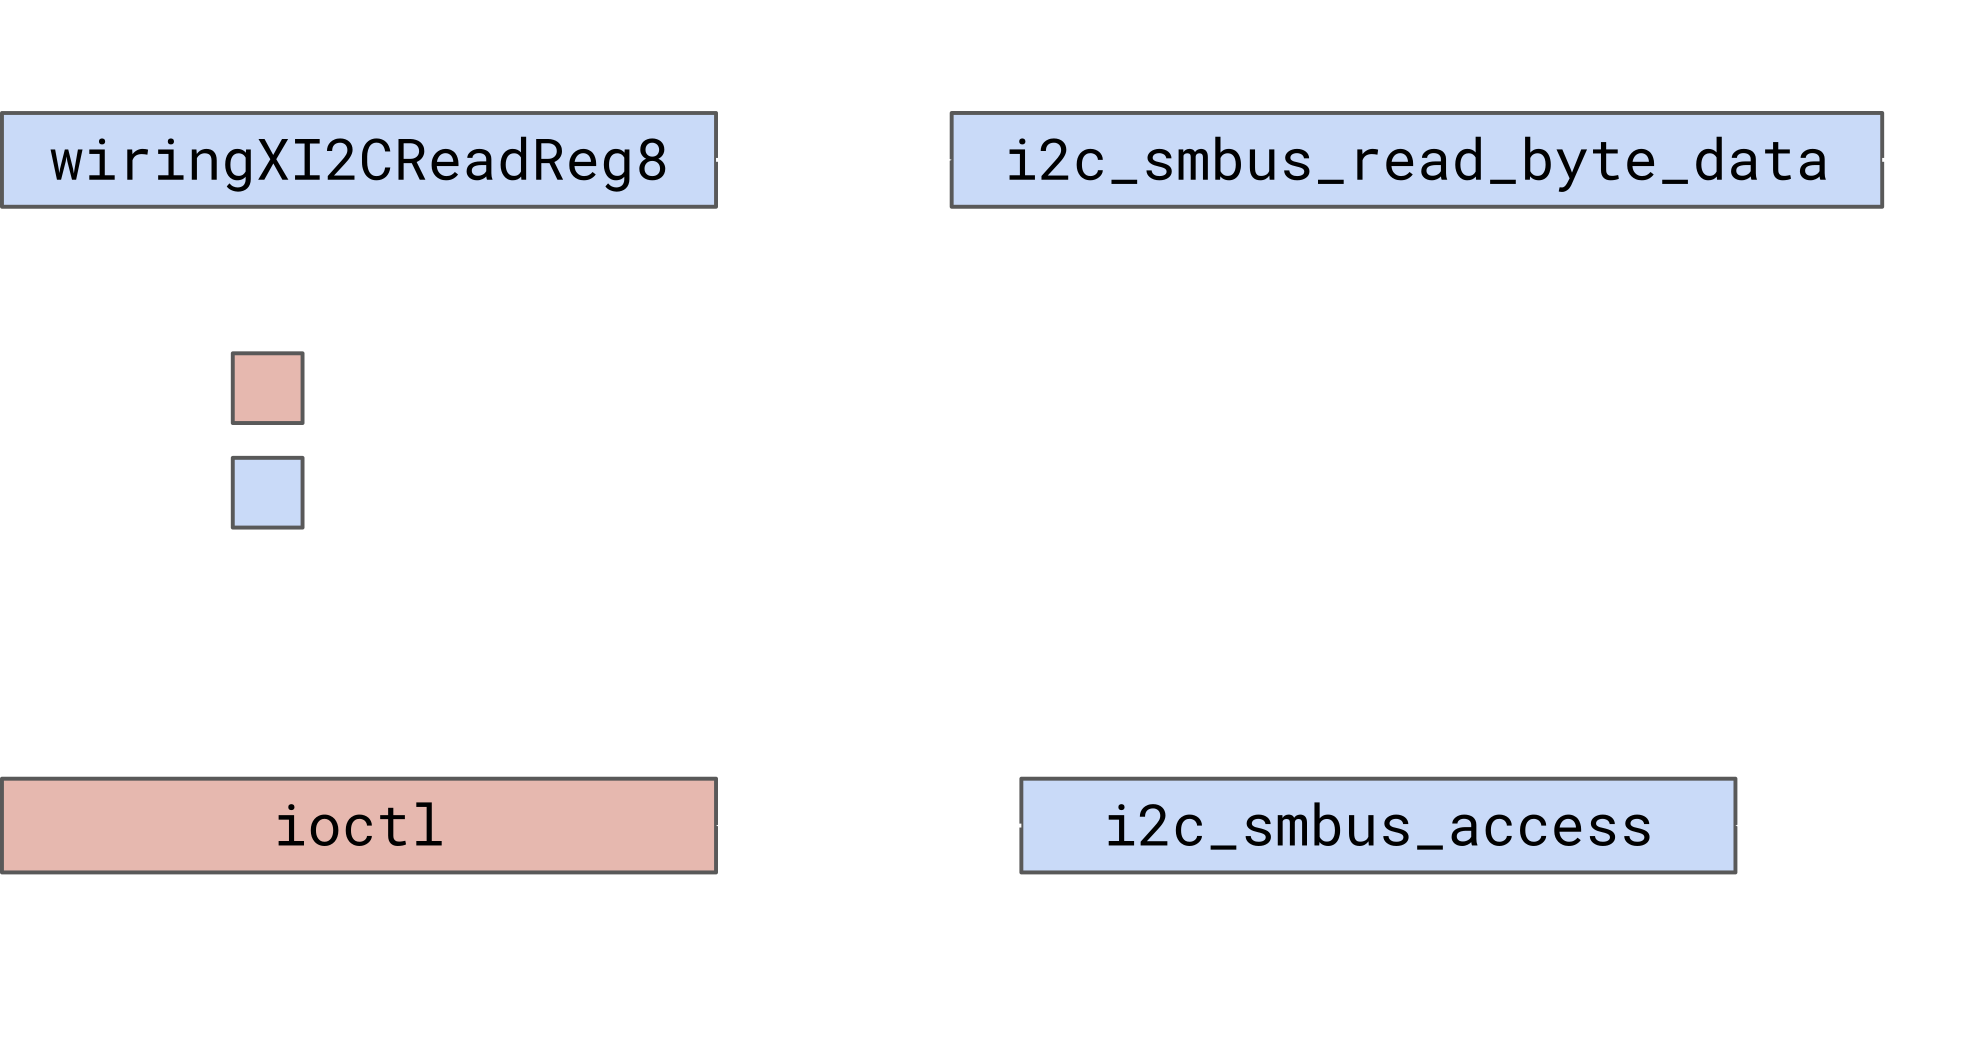
ioctl() is a system call that provides easier access to hardware and other system parts that can’t be expressed as regular files. This is similar to DeviceIoControl() on Windows if you’re familiar with it.

Bring Your Own WiringX
That seems simple enough. If we could modify that exact flow to read a 32-bit value or a block of bytes, we can make this work.
Finding the Right SMBus Parameter
Looking at the code of i2c-tools, we can find the following macros for SMBus transaction types (size):
#define I2C_SMBUS_QUICK		    0
#define I2C_SMBUS_BYTE		    1
#define I2C_SMBUS_BYTE_DATA	    2
#define I2C_SMBUS_WORD_DATA	    3
#define I2C_SMBUS_PROC_CALL	    4
#define I2C_SMBUS_BLOCK_DATA	    5
#define I2C_SMBUS_I2C_BLOCK_BROKEN  6
#define I2C_SMBUS_BLOCK_PROC_CALL   7		/* SMBus 2.0 */
#define I2C_SMBUS_I2C_BLOCK_DATA    8
Code Example
We don’t have a type for DWORD, but we have one for I2C_SMBUS_I2C_BLOCK_DATA! So we can then call i2c_smbus_access() with a I2C_SMBUS_READ operation, a size of I2C_SMBUS_I2C_BLOCK_DATA, and appropriate data. This isn’t the final code, just a demonstration.
int wiringXI2CReadBlockData(int fd, int reg, uint8_t *values, uint8_t size)
{
        union i2c_smbus_data data;

	//In the i2c_smbus_data union, the first byte of the block is treated as the size
        data.block[0] = size;
        int result = i2c_smbus_access(fd, I2C_SMBUS_READ, reg, I2C_SMBUS_I2C_BLOCK_DATA, &data);

        if (result < 0) return result;

        memcpy(values, data.block+1, size);
        return data.block[0];
}
We can write similar code for the write command as well, and voila! It actually works. Unfortunately, I don’t have the chip anymore to be able to show a demo. Instead, here is the I2C capture from a logic analyser.

I2C capture of the controller requesting to read register 0x18 from the peripheral at address 0x2E by writing the byte 0x18 to it. The peripheral then responds with a sequence of the 4 bytes stored in the 32-bit register 0x18

I2C capture of the controller writing to the peripheral at address 0x2E, a sequence of 4 bytes stored at the 32-bit register 0x18
Using Homebrew WiringX
At this stage our code is in a separate file, we want to merge it into WiringX so we can have one nice library that works for us. We also need to build WiringX using the musl toolchain for RISC-V, otherwise, it won’t work.
After writing the final version of my code and cleaning it up, I integrated it into the fork of WiringX. Now that we have a codebase that compiles, it is time to get it compiled for RISC-V.
Getting the Toolchain
After downloading riscv64-linux-musl-cross.tgz from musl.cc, I extracted it to /opt/riscv-musl. You can use whichever directory you like, just make sure you remember it.
Building WiringX
Sadly, WiringX uses CMake. Thankfully, we only need to add two lines to get it to compile for RISC-V with musl. We just need to add the following 2 lines to the CMakeLists.txt file to set the compiler that is to be used.
cmake_minimum_required(VERSION 2.8.9)

#Add the following two files
set(CMAKE_C_COMPILER "/opt/riscv-musl/bin/riscv64-linux-musl-gcc")
set(CMAKE_CXX_COMPILER "/opt/riscv-musl/bin/riscv64-linux-musl-g++")

project(wiringx C)

set(PROJECT_VERSION 2.0)
...
Note that I’ve chosen in this case to extract the toolchain to /opt/riscv-musl. If you’ve chosen another path, then change the paths accordingly.
A friend of mine who is a more seasoned CMake user suggested that a more elegant solution is creating a “toolchain file” that specifies all the required executables and definitions. The file can then be passed using the CMAKE_TOOLCHAIN_FILE variable.
After we’ve set the compiler properly, we can now build the library according to the instructions on their GitHub. This will leave us with 3 important files:
- In the
builddirectory:libwiringx.a: The static library builtlibwiringx.so: The dynamic library built
- In the
srcdirectory:wiringx.h: The header that contains the function declarations. Required for us to be able to use the library in our code by including this header
Compiling our Code
Now, the last step to compiling our code is to include the 3 files above in our toolchain and on our Duo S. We have to make sure to do the following:
- Copy the two libraries from the build directory to
/usr/lib/on the Duo S/opt/riscv-musl/usr/lib/
- Copy the header file from the src directory to
/opt/riscv-musl/usr/include- You could also copy this file to
/usr/includeon your Duo S if you want, though that isn’t needed if you just want to run code on it
- You could also copy this file to
Running our Code
Aaaand there we go. We can now build any program using our fork of WiringX and run it on the Duo S. After testing this code, I decided to create a pull request to include my code extensions into Milk-V’s fork of WiringX. I also created a fork of the main WiringX library with my changes which I plan to make a pull request for soon as well.
Update, 2nd Sep. 2024: I created the pull request for WiringX and it got merged. We’ve also discussed the possibility of merging Milk-V’s fork into upstream WiringX to honour the purpose of the library supporting as many platforms as possible without needing forks.
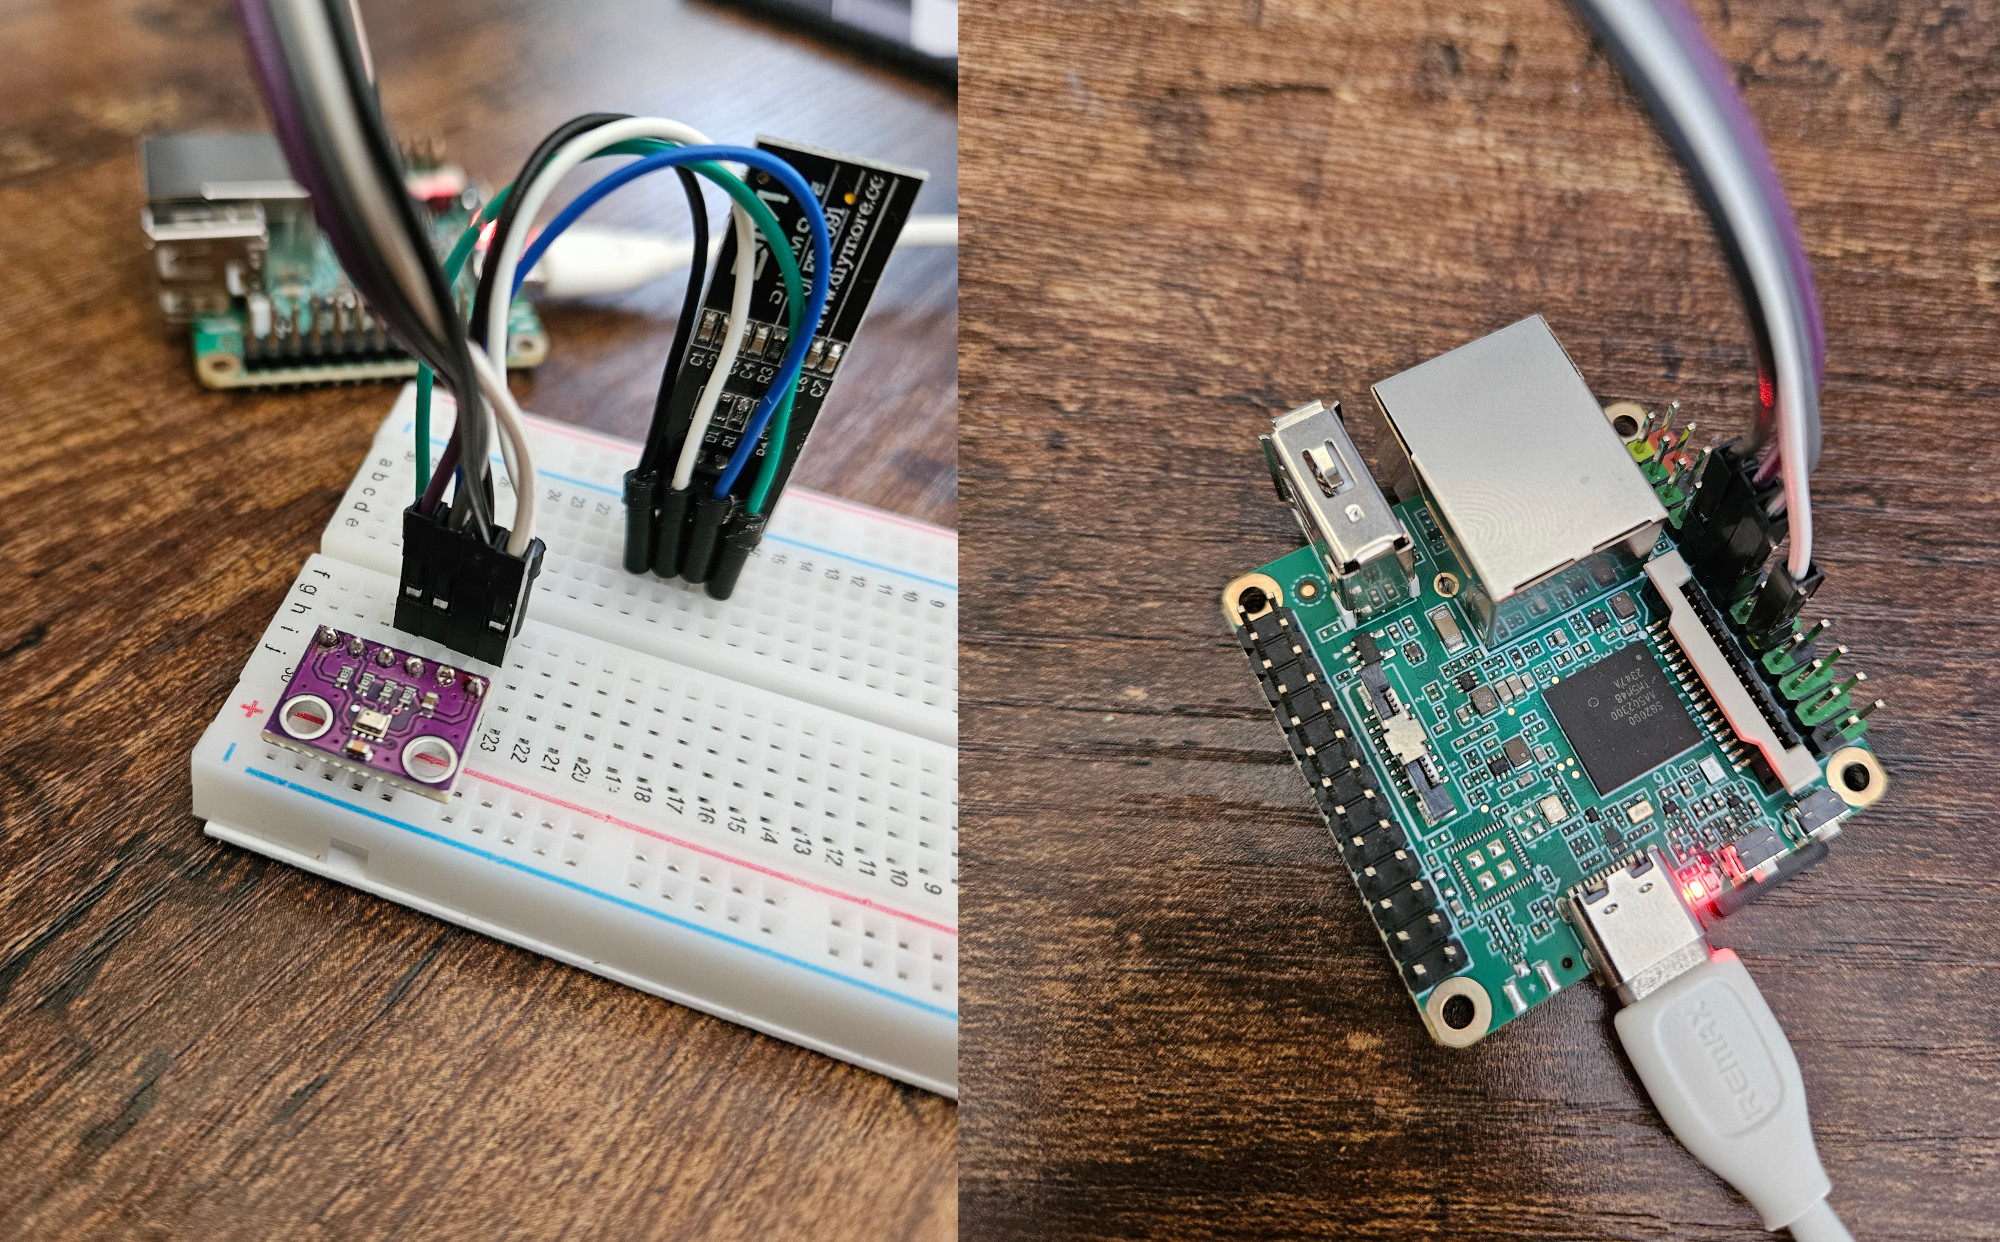
I was going to end the blog post here as it had already gotten too long. However, I can’t leave you all without a proper demo. Since I sadly don’t have the chip my friend gave me anymore, I will use an I2C temperature sensor and an I2C OLED display to display the temperature and pressure. A bit of a cliche project, but it proves that our homebrewed WiringX works.
Homebrew WiringX Demo
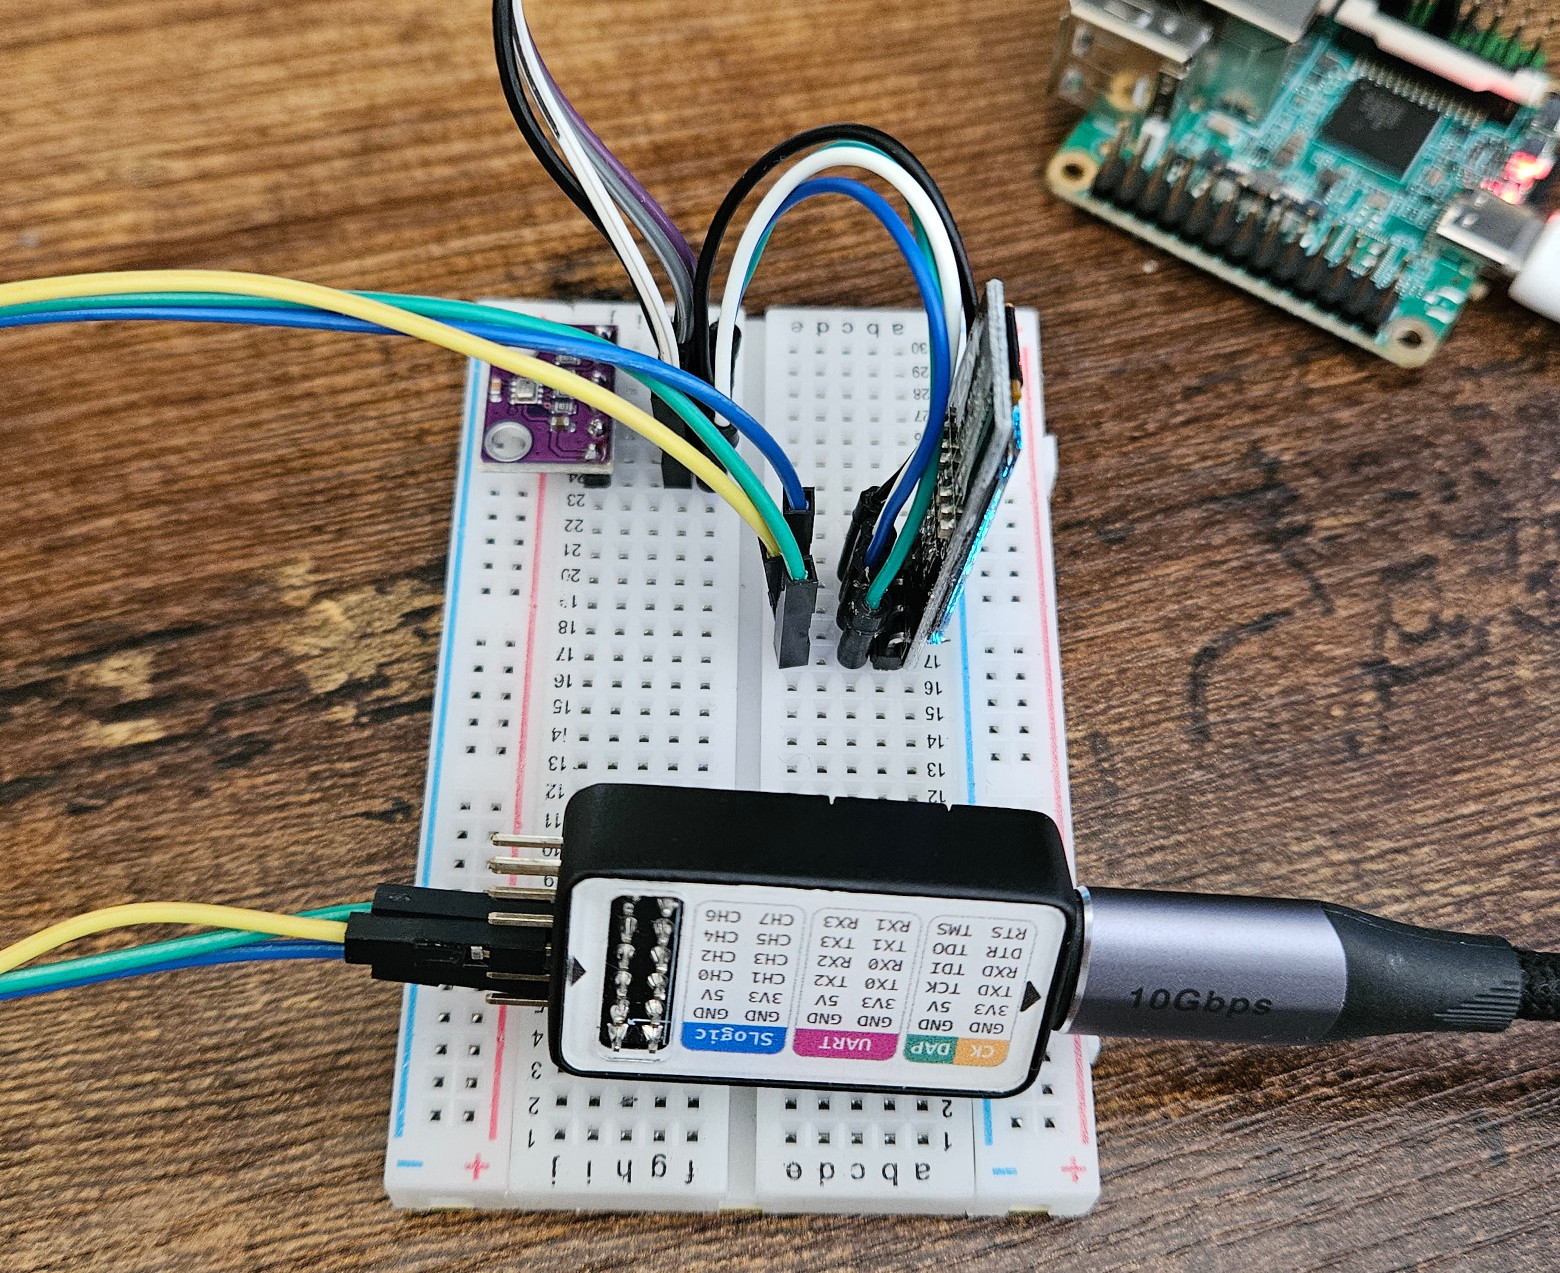
Let’s try our homebrew WiringX. I grasped onto the nearest two I2C components I could find. Luckily, they turned out to be an OLED display and a temperature and humidity sensor. Specifically the SSD1306 and BMP280 respectively. Because we’re using the beautiful I2C bus, we can connect both devices to the same pin on the Duo S. Each device has its own address, and therefore we won’t have any issues!
Let’s connect our controller and peripherals according to the following block diagram:
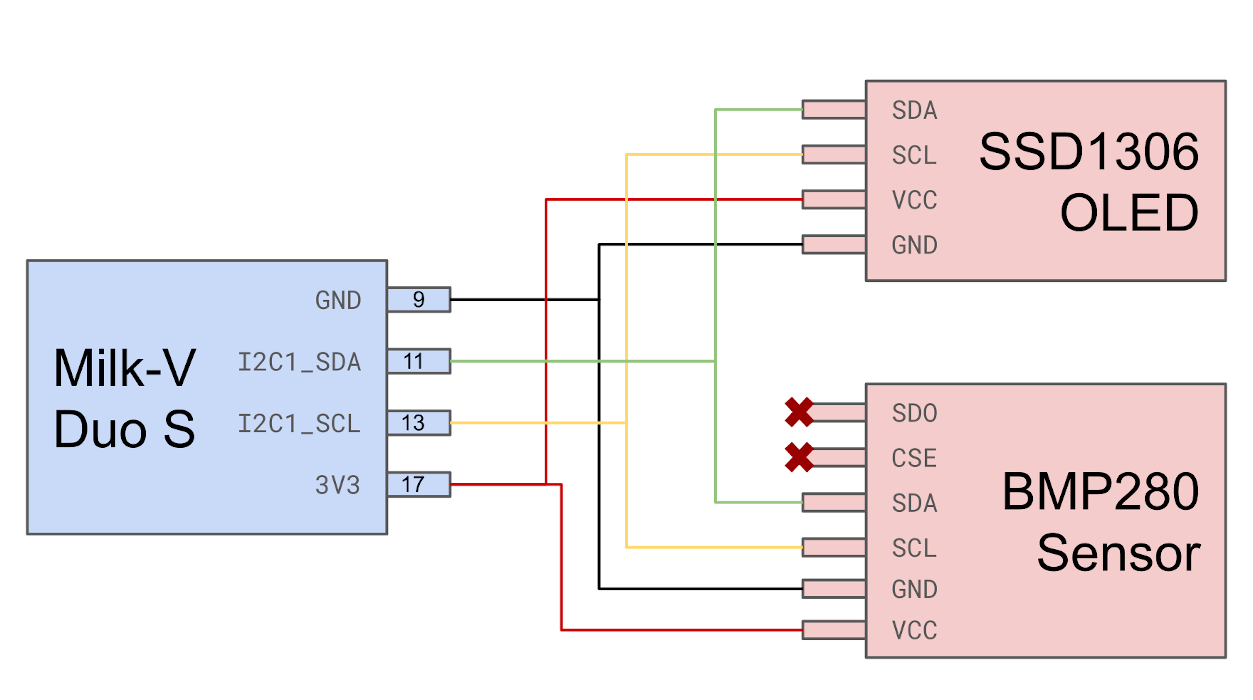
If you want to use a different SBC or microcontroller, make sure to account for pull-up resistors on the I2C bus. I didn’t need any in this case as the Milk-V Duo S has pull up resistors built in.
Notice how there is no separate connection between the OLED display and the Duo S, it is directly connected to the same connections as the temperature sensor.
Without looking it up, try to think of a way of using two different I2C devices that have the same peripheral address.
Addressing the Devices Programmatically
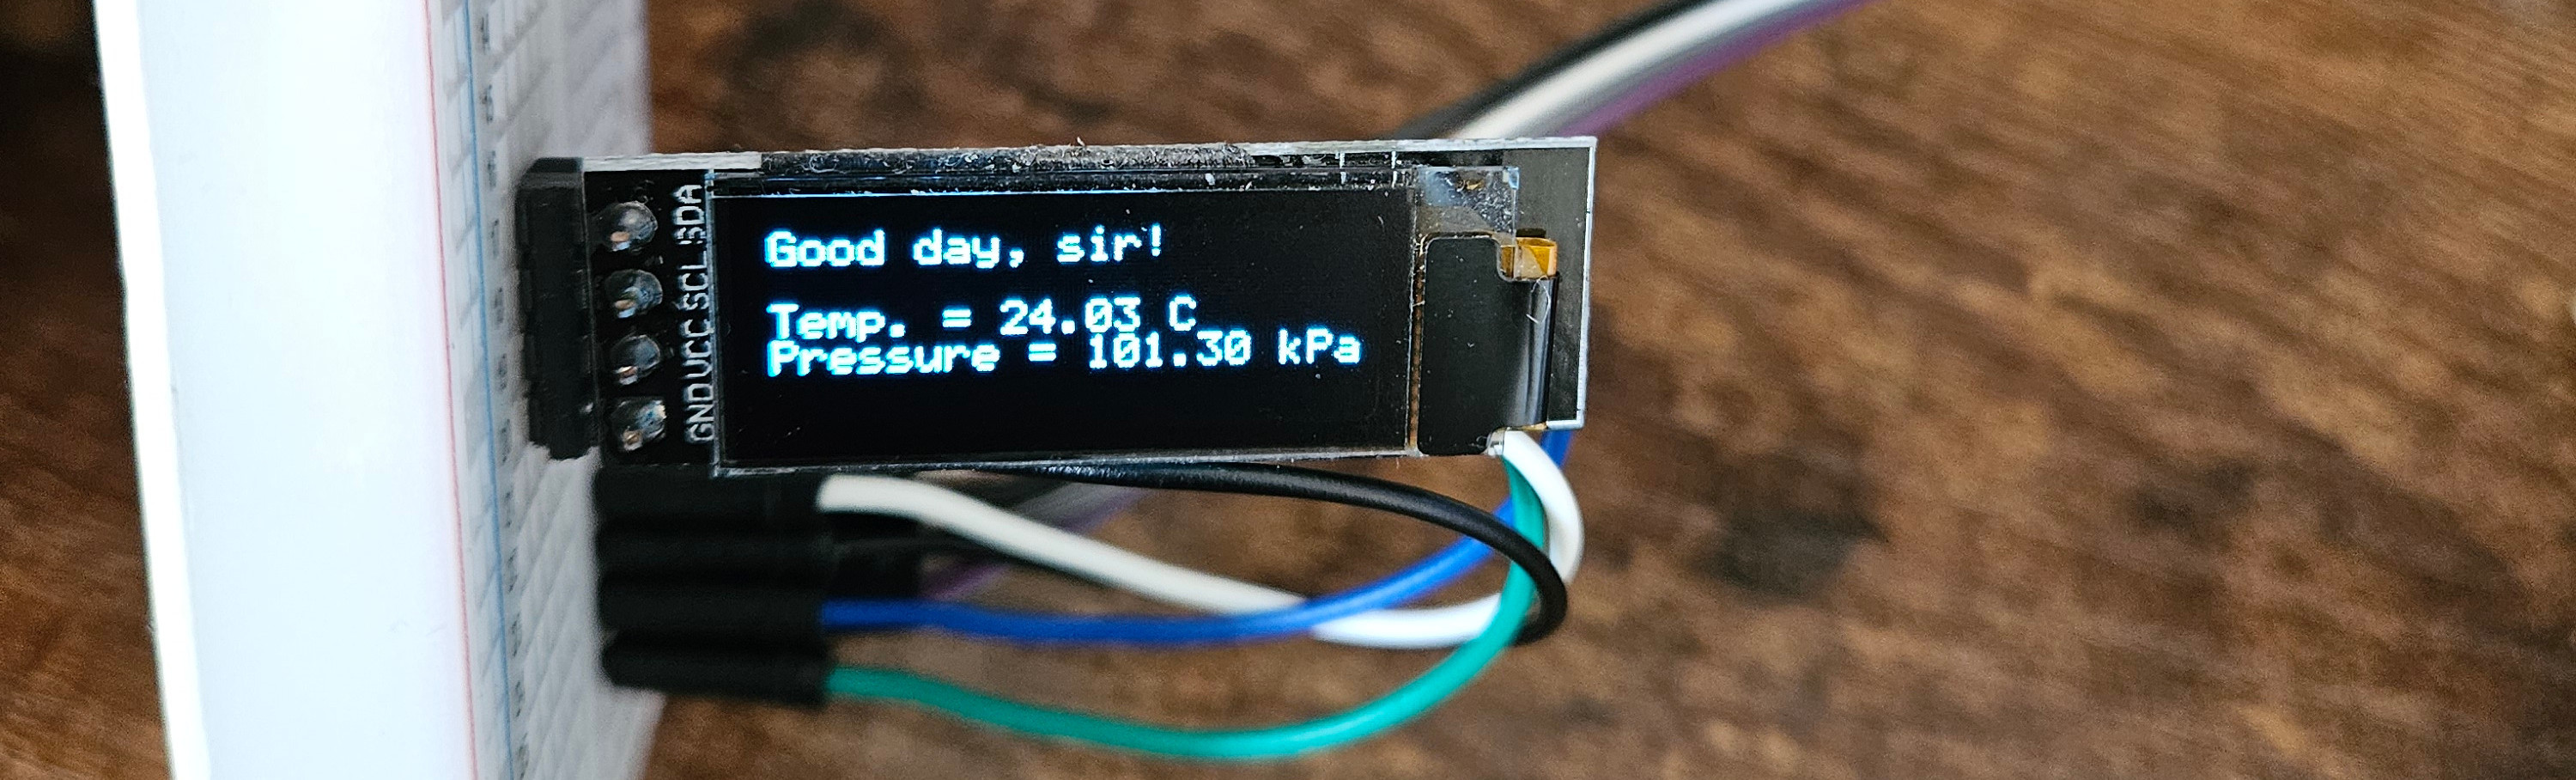
Now, we can address each device in our code. If we look at the datasheets for the devices, we find out that the I2C address for the OLED display is 0x3C and the address for the sensor is 0x76.
Our main.c file could then look something like the following. Note that the full code is available on the repo linked below. These are just some snippets.
#include "bmp280_i2c.h"
#include "ssd1306_i2c.h"
#define I2C_DEV "/dev/i2c-1" // Use I2C port 1
int main()
{
// File descriptors for the I2C peripherals
int i2cTemperatureSensorfd = 0;
int i2cOLEDfd = 0;
wiringXSetup("milkv_duos", NULL);
// Get fd for OLED
i2cOLEDfd = wiringXI2CSetup(I2C_DEV, 0x3C);
...
// Get fd for temperature sensor
i2cTemperatureSensorfd = wiringXI2CSetup(I2C_DEV, 0x76);
...
// Initialise Temperature Sensor
bmp280_init(i2cTemperatureSensorfd);
// Initialise OLED
ssd1306_init(i2cOLEDfd);
...
int32_t raw_temperature;
int32_t raw_pressure;
char temperatureString[24];
char pressureString[24];
while (1)
{
bmp280_read_raw(i2cTemperatureSensorfd, &raw_temperature, &raw_pressure);
int32_t temperature = bmp280_convert_temp(raw_temperature, ¶ms);
int32_t pressure = bmp280_convert_pressure(raw_pressure, raw_temperature, ¶ms);
snprintf(temperatureString, 24, "Temp. = %.2f C", temperature / 100.f);
snprintf(pressureString, 24, "Pressure = %.2f kPa", pressure / 1000.f);
ssd1306_push_string(0, 0, "Good day, sir!" , 8);
ssd1306_push_string(0, 2, temperatureString, 8);
ssd1306_push_string(0, 3, pressureString, 8);
// Poll every 500ms
usleep(500000);
}
}
We initialise WiringX only once, but initialise 2 different peripherals, one at 0x3C and the other at 0x76. After that, we read the temperature and pressure from the sensor and display them on the OLED display.
The code for bmp280_i2c.h and ssd1306_i2c.h is mostly taken from the Duo examples repository. The final code for this project is available on my GitHub at I2C-WiringX-Milk-V.
After building the sense program and copying it to the Duo S, there is one last thing we need to do before we get our glorious temperature and pressure stats.
Pin Multiplexing
The Duo S has many pins. However, not all of the pins are exactly the same. Some pins have more than one function and have to be configured properly. The header we’re using for this project (J3) has a couple of pins that are multiplexed (i.e. have more than one function).
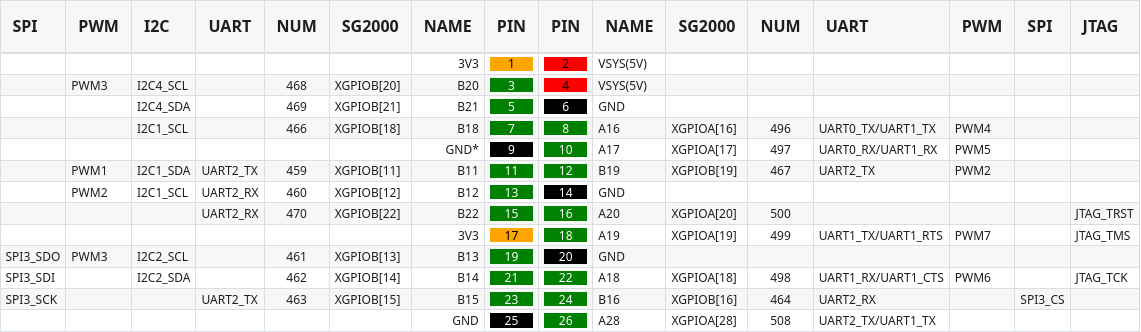
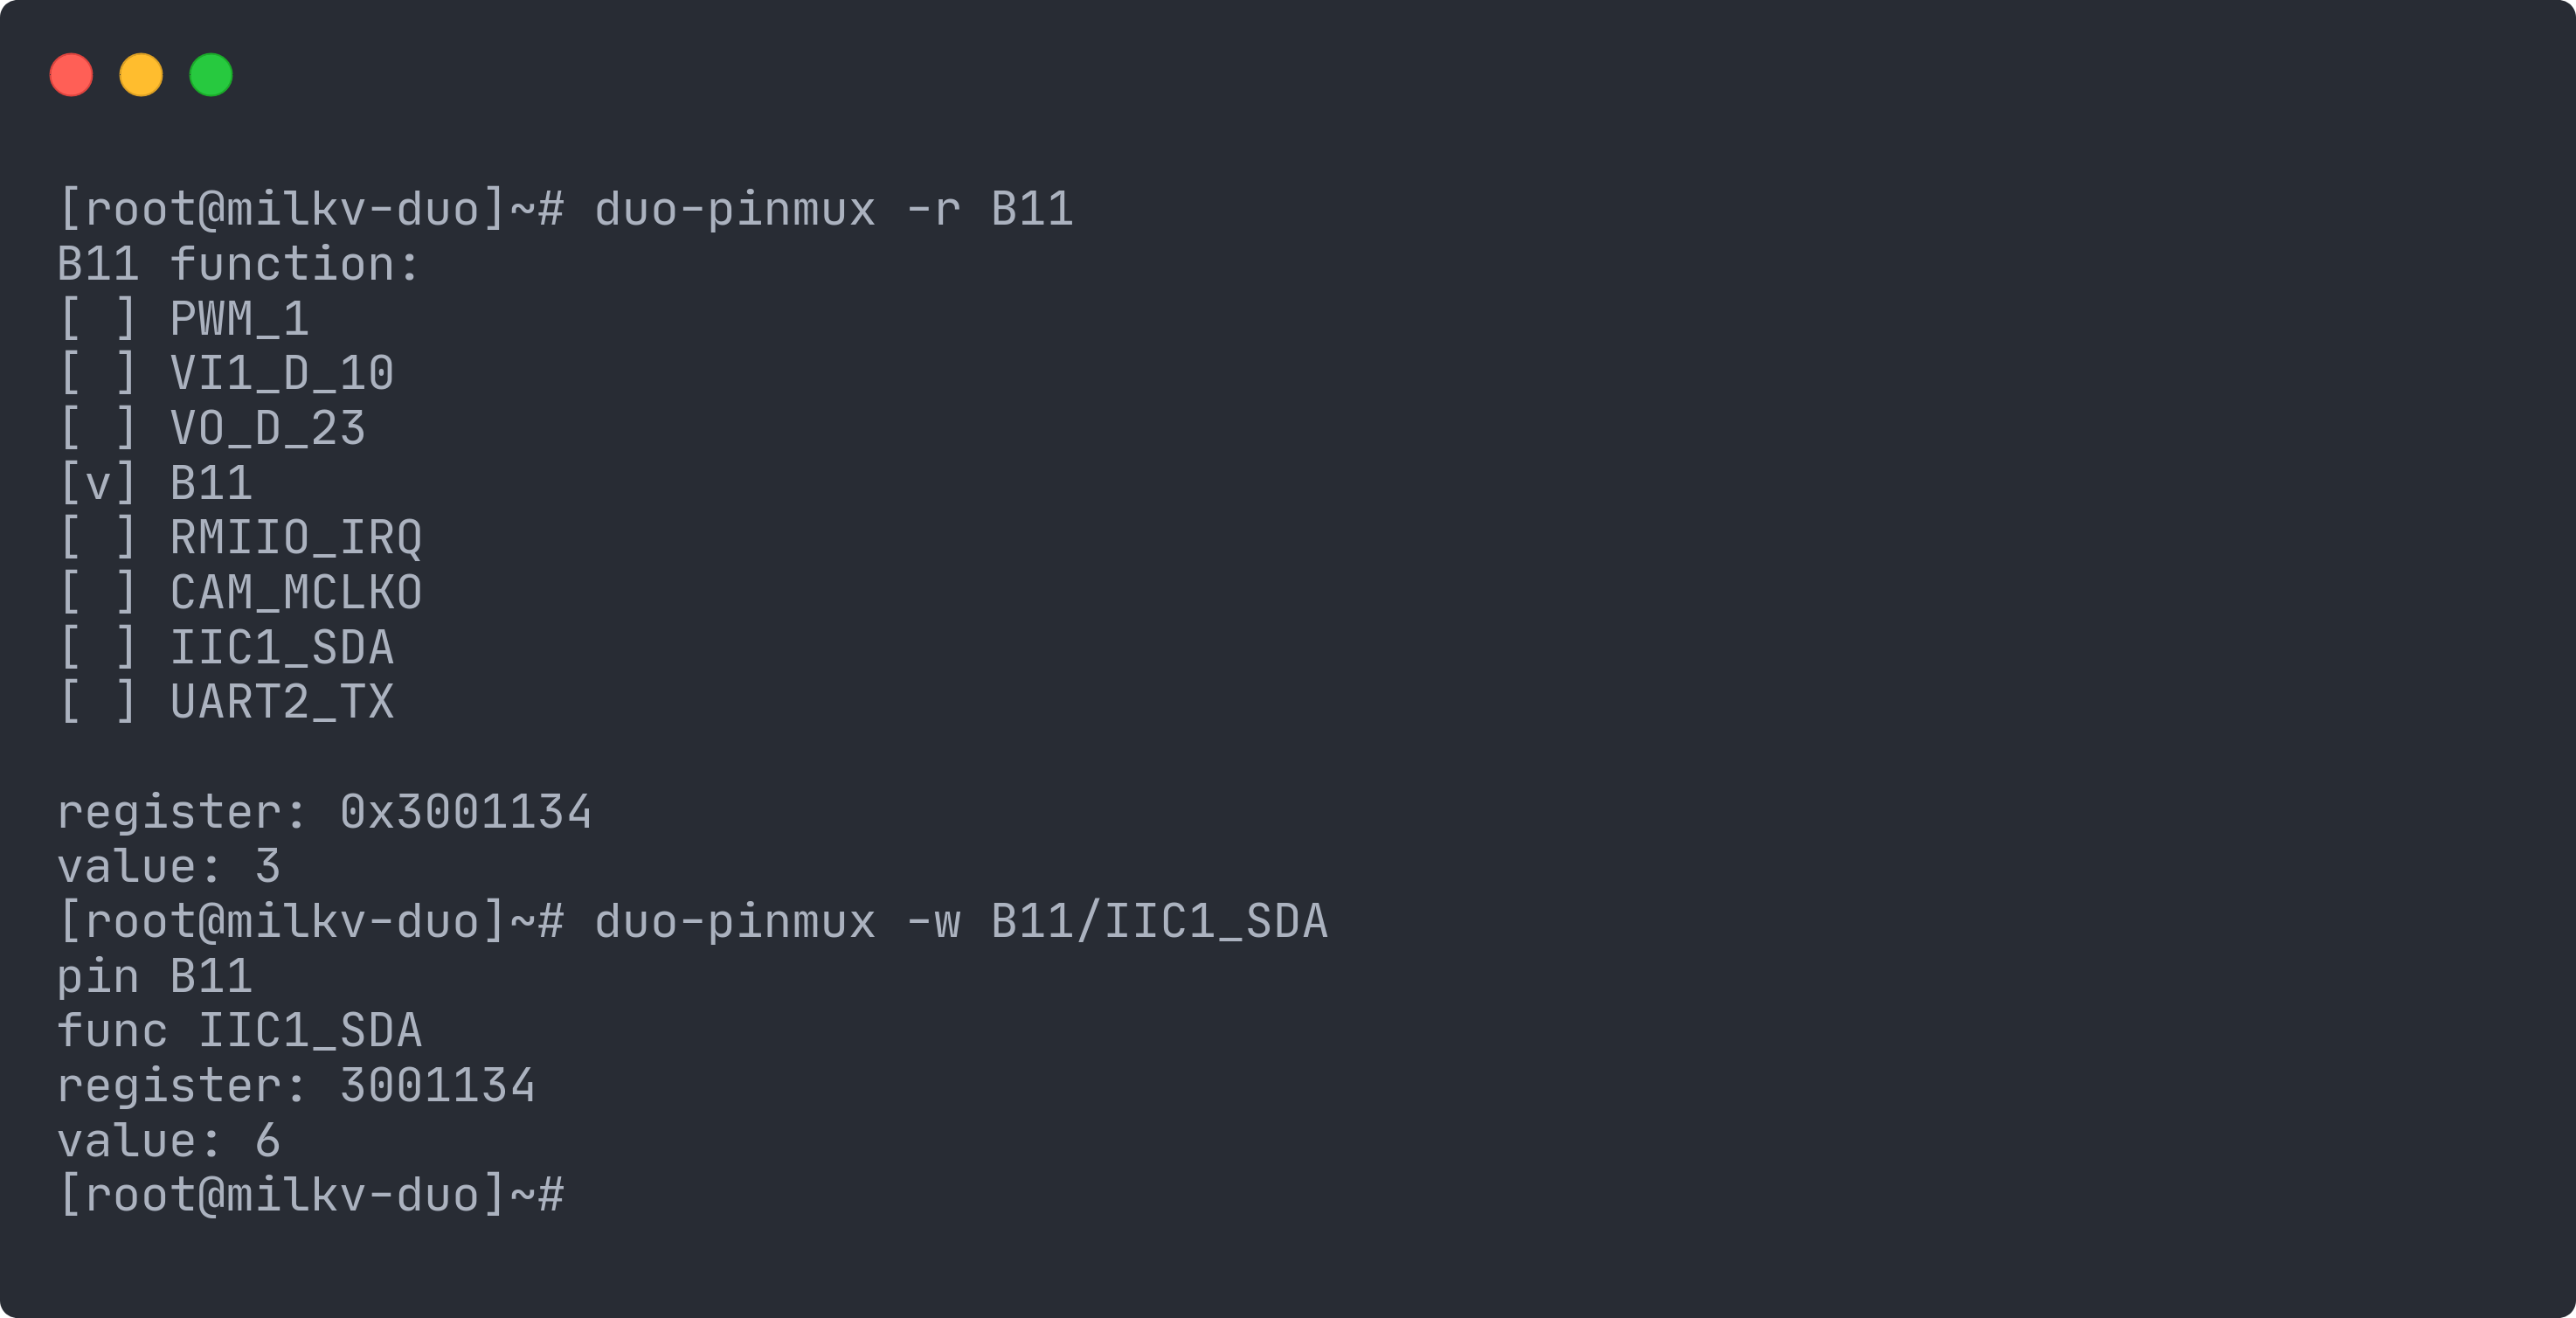
Luckily, this is easily configurable. The Duo S Linux image comes with a duo-pinmux utility that can be used as follows to configure the correct pins. Use the table above to enable or disable the pins you want. In the picture below, I am setting pin B11 to I2C1_SDA. If you’re using the same port as I am using here, pin B12 should be set to I2C1_SCL as well.
While there are a couple of different I2C ports on the Duo S, I found I2C1 to be the most stable for header J3 (3V3 logic levels) and I2C4 the most stable for header J4 (1V8 logic levels).
After the pins are properly configured, we can finally execute our program on the Duo S: ./sense.
Final Output
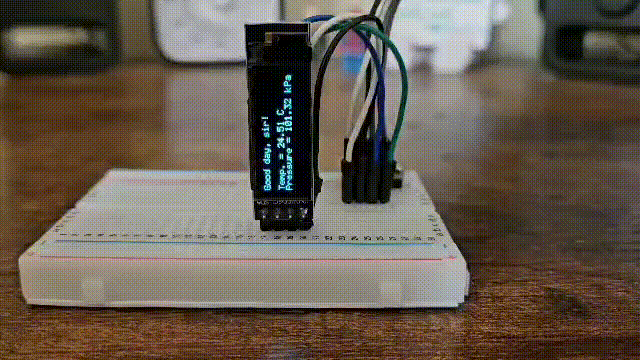
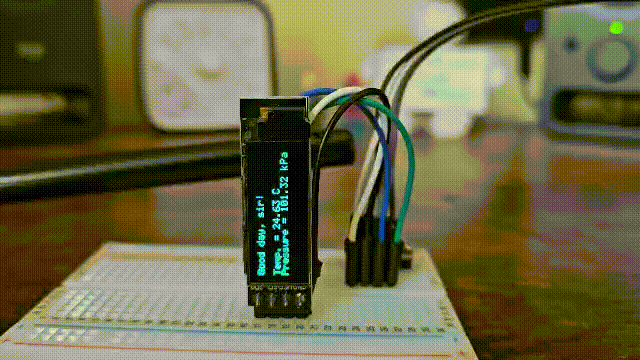
Now, we finally have a working OLED display that displays the temperature and pressure!
If I put my hand on the sensor (i.e. warming it up), we see the temperature rise. Side note: the GIF is sped up a little bit.
If we hook up the cute Sipeed SLogic logic analyser to our circuit here, we can see how the controller communicates with the peripherals.
Here we can see the I2C traffic:

And if we zoom in on the initialisation:

If we check the files that contain the code for initialising the sensor and the display, this traffic checks out! We can also see that every ~500ms the controller polls the sensor and prints to the display, let’s zoom in on that as well.

The capture at the top is the controller writing a command to the sensor and then reading back the pressure and temperature data. The capture at the bottom is all writes, as the controller is writing to the display.
That’s all, folks! Thanks a lot for reading. It has been a super busy year for me so far and I haven’t had much time to write anything. However, I am happy I was able to find the time to sit down and write this one to share this interesting piece of hardware (and software) with all of you :) If you liked this post, please share it with your friends who swap their I2C implementations with SPI.
But, wait! If you’ve made it this far, you might as well stick around for two quick bonus stories! :)
Bonus 001
While looking this SBC up and looking at what software/tooling is available for it, I came across an article that showed how to use TinyCC to write C programs on the (milkv-duo) development board for debugging. It was an interesting find but I didn’t try it. If someone tries it, let me know how it goes!
Important disclaimer, I haven’t inspected or tried the binaries in the TinyCC article mentioned. Therefore, I am not responsible whatsoever if anything goes wrong. I just thought it is worth mentioning that I found that useful article :)
Bonus 002
While testing the temperature sensor, I thought that using a flame close to the sensor would be an okay idea. It was NOT. Thankfully, the sensor did survive but it froze at “183.80 C” until I powered it off and on again.
Lesson: Check the operating temperature range of any sensor before pushing it this far. Not every sensor is an LM35 :)
‘til next time!